Category Archives: Hello World

Hello World

使用jsp输出js

    服务器端将多个js文件整合到一个请求内输出,是一种常用的减少页面请求数的方法;另外,如果js文件间的逻辑是相互依赖的,需要控制它们的加载顺序,在服务器端做文件整合也可以规避这种扯淡的事
    以前php的时候,使用简单的“include”,就可以完成这事,最近做了一个java的项目,也想使用这种方式,就想用jsp的include试试,已经想到了可能会有中文乱码的问题,于是加上了:pageEncoding=”UTF-8″

  <%@ page language="java" import="java.util.*" pageEncoding="UTF-8"%>
  <%@ page contentType="application/javascript" %>
  <%@ include file="xxx1.js" %>
  <%@ include file="xxx2.js" %>
  <%@ include file="xxx3.js" %>

    结果~~~还乱码 o(╯□╰)o
    查了很多资料,做了N多测试,大概有这么几种
  1. 将文件另存为“utf-8”格式,覆盖到项目里
    —-觉得这是多此一举,直接在eclipse里修改文件属性不就行了:检查文件属性,本来就是utf-8
  2. 在web.xml里做一些设置,让js文件可以做jsp解析
    —-无效
  3. script标签加上“charset”,等效的,jquery ajax加载脚本上,加上“scriptCharset”
    —-折腾了半天,还是无效
  4. 。。。。。
    搞来搞去,还是没有成功,jsp的乱码问题果然名不虚传 +_+

    刚才,本着死马当活马医的精神,拿第一种方法试了试,使用txt编辑器将js代码拷出来,另存为utf-8格式,在覆盖到项目目录内~~ok了 ~\(≧▽≦)/~
    (看来eclipse文件属性里的编码只是说以什么编码方式打开,和文件本身的编码的方式无关)

—————
    btw:两年多没有碰过java了,这次帮别的部门做项目,不得不又开始搞jsp,有了php的类比,深感用jsp/tomcat做web网站有多么麻烦,jstl简直多此一举。更喜欢php的方式:通过“”标签将服务器端逻辑和浏览器端的逻辑完全分开,简洁而不失优雅。反观el/jstl,非要将本来属于java端的逻辑与html混在一起~~~java还是适合做复杂的后台逻辑,然后用类似thrift的东西与web端解耦

Hello World 业界杂谈

微信二维码登录功能的实现

微信的二维码登录是个很酷的功能:客户端登录后,通过扫描web端的二维码,实现统一用在web端的登录

下面要讲的就是如何这一个功能:

实现思路:
web:访问web页面时,如果未登陆,会根据随机字符串生成二维码,显示到页面上,同时将该字符串保存起来,然后页面会通过ajax轮询方式访问web端,查看这个二维码是否可以登录,如果可以登录,则将用户名/id写入session,然后将页面跳转到登录状态
客户端:扫描页面的二维码后,通过http方式访问web端,将二维码源字符串,以及客户端登录用户的用户名/id发送过去,告诉web端这个用户可以登录

思路很简单,实现起来也不麻烦,下面会列一些核心代码,详细的,请看这个demo,代码可以到这里下载

web端:
二维码生成,使用qrcode库:

/*
 * $source  二维码源字符串
 * $temp  图片缓存目录
 * $errorCorrectionLevel, $matrixPointSize 错误等级、图片大小
 */
function getQRCodeImg($source, $temp, $errorCorrectionLevel, $matrixPointSize){
	$date = date('Ymd');
	$PNG_WEB_DIR = DIRECTORY_SEPARATOR.$temp.DIRECTORY_SEPARATOR.$date.DIRECTORY_SEPARATOR;
	$PNG_TEMP_DIR = dirname(dirname(__FILE__)).DIRECTORY_SEPARATOR.'webroot'.DIRECTORY_SEPARATOR.$temp.DIRECTORY_SEPARATOR.$date.DIRECTORY_SEPARATOR;
	include_once '../lib/qrcode/qrlib.php';
	if (!file_exists($PNG_TEMP_DIR))
		mkdir($PNG_TEMP_DIR);
 
	if (!in_array($errorCorrectionLevel, array('L','M','Q','H')))
		$errorCorrectionLevel = 'M';    
 
	$matrixPointSize = min(max((int)$matrixPointSize, 1), 10);
 
	$filename = md5($source.'|'.$errorCorrectionLevel.'|'.$matrixPointSize).'.png';
 
	QRcode::png($source, $PNG_TEMP_DIR.$filename, $errorCorrectionLevel, $matrixPointSize, 2); 
 
	return $PNG_WEB_DIR.$filename;
}

页面的ajax相当简单:

//ajax轮询时间间隔,通过服务器配置得到
var ASK_TIME = <?php echo conf('ajax.time');?>;
var i = 0;
$(function(){
	setInterval(function(){
		$.get('page_ask.php?source=<?php echo $source;?>', function(d){
			//登录成功,跳转页面
			if(d && d.login){
				window.location = '';
			}
			//测试信息的显示
			$('div.test').html(i++ + '---' + JSON.stringify(d));
		}, 'json');
	}, ASK_TIME * 1000);
});

page_ask.php的核心代码,服务端存储使用mongodb

//ajax轮询检查是否登录		登录成功返回user,否则为false 
function checkSource($source){
	$collection = getDBCollection(conf('mongo.collection'));
	$sou = $collection->findone(array('_id' => $source));
	if($sou && $sou['login'] === 1){
		return $sou['user'];
	}
	return false;
}

客户端通过访问“/client_login.php?source=xxx&user=张三”实现登录,当然,实际的系统应该是传userId

//取记录  返回  1 登录成功  10 source有误  11 此source已使用过  21 无此user(暂无此项)
function checkSource4Login($source, $user){
	$collection = getDBCollection(conf('mongo.collection'));
	$sou = $collection->findone(array('_id' => $source));
	$r = 10;
	if($sou && isset($sou['login'])){
		if($sou['login'] === 0){
			$r = 1;//校验正确
		}else{
			$r = 11;
		}
	}
	//保存登录状态
	if($r == 1){
		//保存登录状态
		$collection->update(
			array('_id' => $source), 
			array('$set' => array('login' => 1, 'user' => $user)), 
			array('safe'=>true)
		);
	}
	return $r;
}

下面是客户端的几个片段,这里使用的是ios
二维码扫描使用的库是ZBar,注意,需要添加一坨frameworks

-(IBAction)startScan:(id)sender
{
    ZBarReaderViewController *reader = [ZBarReaderViewController new];
    reader.readerDelegate = self;
    ZBarImageScanner *scanner = reader.scanner;
    [scanner setSymbology:ZBAR_I25 config:ZBAR_CFG_ENABLE to:0];
    [self presentModalViewController:reader animated:YES];
    [reader release];
}
//将上面这个方法注册给“开始扫描”按钮:
[QRBut addTarget:self action:@selector(startScan:) forControlEvents:UIControlEventTouchUpInside];
//扫描成功后,会自动调用此方法
- (void) imagePickerController: (UIImagePickerController*) picker didFinishPickingMediaWithInfo: (NSDictionary*) info
{
    UIImage *image = [info objectForKey: UIImagePickerControllerOriginalImage];    
    id<NSFastEnumeration> results = [info objectForKey: ZBarReaderControllerResults];
    ZBarSymbol *symbol = nil;    
    for(symbol in results){
        break;
    }    
    if(!symbol || !image){
        return;
    }    
    NSLog(@"symbol.data = %@", symbol.data);  
    [self sendRQcode:symbol.data];  
    [picker dismissModalViewControllerAnimated: YES];
} //imagePickerController

//取得二维码后,通过http方式发送,然后解析返回的json数据

- (void) sendRQcode:(NSString*)code
{
    NSMutableURLRequest *request = [[NSMutableURLRequest alloc] init];
    NSDate* dat = [NSDate dateWithTimeIntervalSinceNow:0];
    NSTimeInterval a=[dat timeIntervalSince1970];
    NSString *timeString = [NSString stringWithFormat:@"%f", a];
    NSHTTPURLResponse* urlResponse = nil;
    NSError *error = [[NSError alloc] init];
    NSLog(@"-------loginClick------user:%@", timeString);
    NSString *url = [[[[[@"http://xxxxxx/client_login.php?user=" stringByAppendingString:user]                     
            stringByAppendingString:@"&source="] stringByAppendingString:code]
            stringByAppendingString:@"&time="] stringByAppendingString:timeString];
    [request setURL:[NSURL URLWithString:url]];
    [request setHTTPMethod:@"GET"];
    [request setValue:@"application/x-www-form-urlencoded" forHTTPHeaderField:@"Content-Type"];  
    //发送请求  
    NSData *returnData = [NSURLConnection sendSynchronousRequest:request 
            returningResponse:&urlResponse error:&error];
    NSLog(@"-------sendRQcode--status:------%d", [urlResponse statusCode]);
    NSString *login = @"0";
    if(returnData != NULL && [urlResponse statusCode] == 200) {
        //解析json
        NSDictionary *data = [returnData objectFromJSONData];
        NSLog(@"-------sendRQcode----returnData:------%@", data);
        login = [data objectForKey:@"login"];
    }
    NSLog(@"-------sendRQcode----login:------%@", login);
    msg = @"";
    if([login isEqual: @"1"]){
        msg = @"登录成功!";
    }else if([login isEqual:@"0"]){
        msg = @"网络连接错误,请检查网络设置后重试!";
    }else{
        msg = [[@"未知错误(login:" stringByAppendingString:login] stringByAppendingString:@"),请检查网络设置后重试!"];
    }
    NSLog(@"-------sendRQcode----msg:------%@", msg);
    [self alertWithMessage:msg];
}//sendRQcode

———–
代码就展示这么多,具体的,请访问github:https://github.com/jklgithub/qrcode_login
本文为本人原创,转载请注明地址:http://www.jiangkl.com/2012/10/%E4%BA%8C%E7%BB%B4%E7%A0%81%E7%99%BB%E5%BD%95_qrcode_zbar/
演示地址:dev.jiangkl.com (mongo不太稳定,测试不通的话可以给我留言)

Hello World

html5 localStorage使用备忘

localStorage和sessionStorage是html5提出的web存储方案,难能可贵的是,除了chrome/safari/firefox/opera,老大难的IE,从IE8便开始支持它们!所以,今天好好研究了这两个东西:

1. localStorage地持久的,sessionStorage是只对当前页面,也就是“session”的,关闭浏览器、关闭窗口就会失效,甚至在同一个浏览器中再开一个窗口,都不能相互访问。除此之外,二者的表现是一样的

2. 存储容量的大小:html5标准是5M,但具体的,也依照各个浏览器的实际情况(这一点要多加注意)

3. api

window.localStorage.name = 'rainman';           // 赋值
window.localStorage.setItem('name','cnblogs');  // 赋值
window.localStorage.getItem('name');            // 取值
window.localStorage.removeItem('name');         // 移除值
delete window.localStorage.name                 // 移除值
window.localStorage.clear();                    // 删除所有localStorage

4. 在将value付给localStorage时候,会自然的调一下value.toString(),如果value是一个对象,而没有做变换,保存的就是字符串“[object Object]”~~汗吧。所以这里需要用到JSON.stringify()和JSON.parse(),万幸的是支持localStorage,都支持这两个方法(包括IE8)

BTW:其他web存储方式:
Database Storage是html5的“Web SQL Database”API,可以想操作其他关系型数据库一样,使用sql读写~~可惜的是,只有Chrome支持它
————

Hello World

html5研究—-自动化的manifest

manifest是html5提供的离线web应用解决方案,它的作用有两个:
1. 连网情况下,访问使用manifest的页面时(之前曾经访问过),会先加载一个manifest文件,如果这个manifest文件没有改变,页面相关的资源便都来自浏览器的离线缓存,不会再有额为的网络请求,从而大大提高页面相应时间
2. 断网时,在浏览器地址栏输入页面url,仍然能够正常显示页面,以及正常使用不依赖ajax的功能

之前曾想在手机webview的开发中使用这种功能,但权衡再三,也没有使用,其中一个原因,便是manifest配置太繁琐,很不利于开发和维护,比如,一个正常的manifest文件是这样的:

test.manifest

CACHE MANIFEST
 
# VERSION 0.3
 
# 直接缓存的文件
CACHE:
/index.html
/img/x1.png
/img/x2.png
/img/x3.png
/js/xx.js
/css/xx.css
 
# 需要在线访问的文件
NETWORK:
 
# 替代方案
FALLBACK:

也就是说,每一个要缓存的文件都要配置到“CACHE”下面,每次修改这些文件后,都要修改VERSION~~

但是,离线缓存这个功能又是如此的诱人,所以就想着用其他方式绕开繁琐的配置

首先,test.manifest文件的扩展名必须是manifest静态文件,不能动态声称,于是便想使用php来生成manifest文件,对于apache服务器,再网站根目录下添加.htaccess文件,将/xxx.manifest请求,转给/manifest/xxx.php:

.htaccess

RewriteEngine on
RewriteRule ^([a-zA-Z0-9_\-]{1,})\.manifest$ manifest/$1.php

然后,我们要寻找一个可以自动更新的VERSION,我这里使用的时文件更新时间,对,寻找所有缓存文件中最晚修改过的那个文件的更新时间,然后将可能需要缓存的文件列表打印出来

index.html

<!DOCTYPE HTML>
<html manifest="/test.manifest">
    <head>
        <meta charset="UTF-8">
        <title>manifest测试</title>
        <link rel='stylesheet' href='/css/test.css' />
        <link rel='stylesheet' href='/css/test2.css' />
        <script type='text/javascript' src='/js/test.js'></script>
    </head>
<body>
    <img src="/img/test-pass-icon.png"></img>
    <hr>
    <img src="/img/btn_s.png"></img>
    <hr>
    <img src="/img/charts_images/dragIcon.gif"></img>
    <hr>
    <img src="/img/xx.png"></img>
    <hr>
</body>
</html>

/test.manifest将会转到/manifest/test.php:

/manifest/test.php

<?php 
    require_once 'manifestUtil.php';
    //配置信息
    $webroot = '../';
    $urlroot = '';
    //需要缓存的目录和文件(目录内的所有文件都将被输出)
    $sources = array(
        'img',
        'js/test.js',
        'css',
    );
 
    $updateTime = 0;
    $files = listFiles($sources, $updateTime, $webroot, $urlroot);
?>
CACHE MANIFEST 
# version <?php echo $updateTime;?>
 
CACHE:
/index.html
<?php echoFiles($files);?>
 
NETWORK:
*
 
FALLBACK:

manifestUtil.php

<?php 
//更具配置信息,读取文件列表
function listFiles($sources, &$updateTime, $webroot = '../', $url = ''){
    $r = array();
    foreach($sources as $s){
        $r = array_merge($r, getFiles($webroot.'/'.$s, $updateTime, $url.'/'.$s));
    }
    return $r;
}
//读取文件列表
//$types,需要缓存的文件类型
function getFiles($fileName, &$updateTime = 0, $url = '', $levels = 100, 
        $types = array('jpg', 'png', 'gif', 'jpeg', 'css', 'js')){
    if(empty($fileName) || !$levels){
        return false;
    }
    $files = array();
    if(is_file($fileName)){
        $updateTime = getMax(filectime($fileName), $updateTime);
        $files[] = $url;
    }else if($dir = @opendir($fileName)){
        while(($file = readdir($dir)) !== false){
            if(in_array($file, array('.', '..')))
                continue;
            if(is_dir($fileName.'/'.$file)){
                $files2 = getFiles($fileName.'/'.$file, $updateTime, $url.'/'.$file, $levels - 1);
                if($files2){
                    $files = array_merge($files, $files2);
                }
            }else{
                $updateTime = getMax(filectime($fileName.'/'.$file), $updateTime);
                $type = end(explode(".", $file));
                if(in_array($type, $types)){
                    $files[] = $url.'/'.$file;
                }
            }
        }
    }
    @closedir($dir);
//    echo date("Y-m-d H:i:s",$updateTime).'<hr>';
    return $files;
}
//打印缓存文件列表
function echoFiles($files){
        for($i = 0; $i < count($files); $i++){
            echo $files[$i].'
';//后面加一个换行
        }
}
//取较大的更新时间
function getMax($a, $b){
    return $a < $b ? $b : $a;
}

over~~~就是这些,下面的可能出现的问题:
这个只是初级方案,对于动态网页还有问题,比如,你请求不是静态的html,而是动态的php,而这个php里有require了其他的php,如果这些php发生了修改,上面的方案时不知道的,生成的manifest不会发生变化,这里就需要对方案做一个升级:除$sources之外,再加一个,比如$aboutSources,来配置其他相关文件,拿$aboutSources再调一次listFiles,综合$sources与$aboutSources的updateTime生成VERSION值
另外一个问题是,遍历相关文件,需要多次磁盘IO,如果文件太多,也会消耗较多的时间~~~凡事有利必有弊,如果对此不满,可以手动配置一个VERSION,每次修改后,更新VERSION值
—————
本文为本人原创,转载请注明出处
github:https://github.com/jklgithub/auto_manifest.git
参考:青梅煮酒-HTML5 离线存储实战之manifest

Hello World

node.js入门—-静态文件服务器

本文展示是基于node.js的静态文件服务器,代码参考自这里,主要是练习node http、文件模块的使用,另外,对理解http协议也很有帮助
除了实现了基本的路由控制,还实现了MIME类型、304缓存、gzip压缩、目录读取

首先是配置文件,setting.js

var setting = {
  webroot : '/xxx/xxx/webroot',
  viewdir : false,
  index : 'index.html',	//只有当viewdir为false时,此设置才有用
  expires : {
    filematch : /^(gif|png|jpg|js|css)$/ig,
    maxAge: 60 * 60 //默认为一个月
  },
  compress : {
    match : /css|js|html/ig
  }
};
module.exports = setting;

MIME映射,mime.js

var mime = {
  "html": "text/html",
  "ico": "image/x-icon",
  "css": "text/css",
  "gif": "image/gif",
  "jpeg": "image/jpeg",
  "jpg": "image/jpeg",
  "js": "text/javascript",
  "json": "application/json",
  "pdf": "application/pdf",
  "png": "image/png",
  "svg": "image/svg+xml",
  "swf": "application/x-shockwave-flash",
  "tiff": "image/tiff",
  "txt": "text/plain",
  "wav": "audio/x-wav",
  "wma": "audio/x-ms-wma",
  "wmv": "video/x-ms-wmv",
  "xml": "text/xml"
};
module.exports = mime;

然后是主程序,server.js

var http = require('http');
var setting = require('./setting.js');
var mime = require('./mime');
var url = require('url');
var util = require('util');
var path = require('path');
var fs = require('fs');
var zlib = require('zlib');
//访问统计
var number = 0;
var accesses = {};
 
http.createServer(function(req, res){
  res.number = ++number;
  accesses[res.number] = {startTime : new Date().getTime()};
  var pathname = url.parse(req.url).pathname;
  //安全问题,禁止父路径
  pathname = pathname.replace(/\.\./g, '');
  var realPath = setting.webroot + pathname;
  accesses[res.number].path = pathname;
  readPath(req, res, realPath, pathname);
}).listen(8000);
 
console.log('http server start at parth 8000\n\n\n');
//判断文件是否存在
function readPath(req, res, realPath, pathname){
  //首先判断所请求的资源是否存在
  path.exists(realPath, function(ex){
    console.log('path.exists--%s', ex);
    if(!ex){
      responseWrite(res, 404, {'Content-Type' : 'text/plain'}, 
          'This request URL ' + pathname + ' was not found on this server.');
    }else{
      //文件类型
      fs.stat(realPath, function(err, stat){
        if(err){
          responseWrite(res, 500, err);
        }else{
          //目录
          if(stat.isDirectory()){
            //是否读取目录
            if(setting.viewdir){
              fs.readdir(realPath, function(err, files){
                if(err){
                  responseWrite(res, 500, err);
                }else{
                  var htm = '<html><head><title>' + pathname + '</title></head><body>' + pathname + '<hr>';
                  for(var i = 0; i < files.length; i++){
                    htm += '<br><a href="' + pathname + (pathname.slice(-1) != '/' ? '/' : '') 
                        + files[i] + '">' + files[i] + '</a>', 'utf8';
                  }
                  responseWrite(res, 200, {'Content-Type' : 'text/html'}, htm);
                }
              });
            }else if(setting.index && realPath.indexOf(setting.index) < 0){
              readPath(req, res, path.join(realPath, '/', setting.index), path.join(pathname, '/', setting.index));
            }else{
              responseWrite(res, 404, {'Content-Type' : 'text/plain'}, 
                  'This request URL ' + pathname + ' was not found on this server.');
            }
          }else{
            var type = path.extname(realPath);
            type = type ? type.slice(1) : 'nuknown';
            var header = {'Content-Type' : mime[type] || 'text/plain'};
            //缓存支持
            if(setting.expires && setting.expires.filematch 
                && type.match(setting.expires.filematch)){
              var expires = new Date(),
              maxAge = setting.expires.maxAge || 3600 * 30;
              expires.setTime(expires.getTime() + maxAge * 1000);
              header['Expires'] = expires.toUTCString();
              header['Cache-Control'] = 'max-age=' + maxAge;
              var lastModified = stat.mtime.toUTCString();
              header['Last-Modified'] = lastModified;
              //判断是否304
              if(req.headers['if-modified-since'] && lastModified == req.headers['if-modified-since']){
                responseWrite(res, 304, 'Not Modified');
              }else{
                readFile(req, res, realPath, header, type);
              }
            }else{
              readFile(req, res, realPath, header, type);
            }
          }
        }
      });
    }
  });
}
//读文件/压缩/输出
function readFile(req, res, realPath, header, type){
  var raw = fs.createReadStream(realPath), cFun;
  //是否gzip
  if(setting.compress && setting.compress.match 
      && type.match(setting.compress.match) && req.headers['accept-encoding']){
    if(req.headers['accept-encoding'].match(/\bgzip\b/)){
      header['Content-Encoding'] = 'gzip';
      cFun = 'createGzip';
    }else if(req.headers['accept-encoding'].match(/\bdeflate\b/)){
      header['Content-Encoding'] = 'deflate';
      cFun = 'createDeflate';
    }
  }
  res.writeHead(200, header);
  if(cFun){
    raw.pipe(zlib[cFun]()).pipe(res);
  }else{
    raw.pipe(res);
  }
}
//普通输出
function responseWrite(res, starus, header, output, encoding){
  encoding = encoding || 'utf8';
  res.writeHead(starus, header);
  if(output){
    res.write(output, encoding);
  }
  res.end();
  accesses[res.number].endTime = new Date().getTime();
  //日志输出
  console.log('access[%s]--%s--%s--%s--%s\n\n', res.number, accesses[res.number].path, 
      (accesses[res.number].endTime - accesses[res.number].startTime), 
      starus, (output ? output.length : 0));
 delete accesses[res.number];
}

over!
尚欠缺的功能:日志记录、断点、容错等~~以后有时间再加啦

Hello World

node.js入门—-做个代理服务器

看到node.js的httpServer和http.request,第一个想法居然是可以用它做一个代理服务器
下面代码,实现了代理的基本功能,通过网络的代理设置将你的浏览器的请求转到这个httpServer上,其接收到浏览器的http请求,转发到目的服务器,再将收到的数据转移到浏览器~~~就一二道贩子。

var _http = require('http'),
    _util = require('util'),
    //记录当前是第几个请求
    number = 0;
 
_http.createServer(function(req, res){
	number++;
	res.number = number;
	var headers = req.headers,
		post = '',
		url = req.url;	//_url.parse(req.url, true)--解析url
	console.log('\n======\n[' + number + ']--http--start--[' + req.method + ']' + url);
	if(req.method == 'POST'){
		//接收post
		req.on('data', function(chunk){
			post += chunk;
		});
		req.on('end', function(){
			post = _querystring.parse(post);
			httpRequest(res, headers, url, post);
		});
	}else{
		httpRequest(res, headers, url);
	}
}).listen(3333);
 
console.log('http server start at parth 3333\n\n\n');
 
/*
 * 发送请求
 */
function httpRequest(mainRes, headers, url, post){
	var host = headers.host;
	host = host.split(':');
	var options = {
		host : host[0],
		port : (host[1] ? host[1] : '80'),
		path : url,
		method : (post ? 'POST' : 'GET'),
		headers : headers
	};
	//去掉gzip
	delete options.headers['accept-encoding'];
	console.log('[' + mainRes.number + ']----start http.request-- options:\n%s\n', _util.inspect(options));
 
	var req_ = _http.request(options, function(res_){
		var status_ = res_.statusCode,
			headers_ = res_.headers,
			data = '';
		console.log('[' + mainRes.number + ']----export http.request-(' + status_ + ')-headers:%s', 
				_util.inspect(headers_));
 
		//写header
		mainRes.writeHead(status_, headers_);
 
		var encoding = 'utf8';
		//根据数据类型确定编码方式
		if(headers_['content-type'] && (headers_['content-type'].indexOf('image') >= 0 
				|| headers_['content-type'].indexOf('application') >= 0 
				|| headers_['content-type'].indexOf('audio') >= 0 
				|| headers_['content-type'].indexOf('video') >= 0)){
			encoding = 'binary';
		}
		res_.setEncoding(encoding);
		//接收数据,转给原请求
		res_.on('data', function(d){
			console.log('data-------' + d.length);
			var b = new Buffer(d, encoding);
			mainRes.write(b, encoding);
		});
		res_.on('end', function(){
			//请求结束
			mainRes.end();
			console.log('[' + mainRes.number + ']--------http.request---end----');
		});
	});
	req_.on('error', function(e){
		console.log([' + mainRes.number + '] + '----ERROR----problem with request: ' + e.message);
	});
	//发送post
	if(post){
		req_.write(_querystring.stringify(post));
	}
	req_.end();
}

当然,这段代码仅仅是学习目的的,并没有什么实际意义,https、gzip的问题都没解决,如果网站是gbk的,拿它访问也会乱码
如果要拿它翻墙,需要部署两个类似的服务,比如墙外A墙内B,将浏览器代理到B,由B将host隐藏起来,再转到A,A将隐藏的目的host恢复过来,再去访问最终的目的网站
用上面的目的试了试非死不可,不稳定,时不时的会出错~~等完善的再分享给大家

Hello World

node.js入门—-安装npm

npm是node.js的包管理器,有了它,就可以方面的下载、安装各种工具包
记得一年给mac安装npm的时候,还废了很大的劲,需要安装一些依赖,但是现在,有了更方便的安装方式:
curl http://npmjs.org/install.sh | sh
但是,我实际用上面的命令,会报错:“Error: EPERM, chmod ‘/usr/local/bin/npm’。。。”
没有仔细研究错误,直接把install.sh下载到本地,然后:
sh install.sh
还是不行~~~~
后来有查了资料,原来是需要root权限
sudo sh npm-install.sh
执行命令,输入密码,就ok啦

Hello World 美图酷图

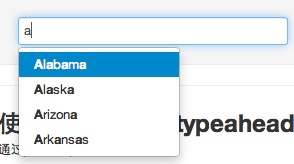
让bootstrap的自动补齐功能支持ajax数据源


如上图,bootstrap的自动补齐功能非常好用($(‘#xxx’).typeahead()),可以自定义筛选、排序方法,对键盘操作的支持也非常好,可惜,美中不足的是。。。它不支持可变数据源,如果提示数据需要通过ajax取得的,就用不了了
无奈,只能改它源码了~~~只要简单的3个小修改

1. 添加updateSource方法

//在Typeahead类的构造方法里,添加:
this.updateSource = this.options.updateSource || false

2. 鼠标输入时,先执行updateSource方法

//找到keyup方法,修改switch的default项:
if(this.updateSource){
  var that = this
  this.updateSource(this.$element.val(), function(source){
    //取得新数据源后的回调
    that.source = source;
    that.lookup()
  });
}else{
  //如果没有配置updateSource,直接执行lookup方法
  this.lookup()
}

3. 修改筛选数据源的方法

//找到lookup方法,然后同时是否配置了updateSource,判断是否执行默认的筛选方法
if(!this.updateSource){
  items = $.grep(this.source, function (item) {
    if (that.matcher(item)) return item
  })
  items = this.sorter(items)
}else{
  items = this.source;
}

ok,大功告成
并且,这里只是“扩展了typeahead方法”,如果使用固定的数据源,还可以照着之前的方式使用,在需要使用ajax数据源的时候:

	$('#input_typeahead').typeahead({
		source : [],
		items : 7,
		highlighter : function(item){
			return item;
		},
		updateSource : function(inputVal, callback){
			$.ajax({
				type : 'POST',
				url : '/test/ajax_search_tip',
				dataType : 'json',//返回需要展示的json数组
				data : {length : 5, input : inputVal},
				success : function(d){
					callback(d);
				}
			});
		}
	});

——-
嘿嘿,顺便发个美图

Hello World 他山石

ios入门—-定位的使用[转]

IOS中的core location提供了定位功能,能定位装置的当前坐标,同时能得到装置移动信息。因为对定位装置的轮询是很耗电的,所以最好只在非常必要的前提下启动。
其中,最重要的类是CLLocationManager,定位管理。
其定位有3种方式:
1,GPS,最精确的定位方式,貌似iphone1是不支持的。
2,蜂窝基站三角定位,这种定位在信号基站比较秘籍的城市比较准确。
3,Wifi,这种方式貌似是通过网络运营商的数据库得到的数据,在3种定位种最不精确

使用方式:
1,引入CoreLocation的包,一般的默认模板里是没有的,所以需要手动导入。
2,通过启动CLLocationManager来启动定位服务,因为定位信息是需要轮询的,而且对于程序来说是需要一定时间才会得到的,所以翠玉lcationManager的操作大多都给委托来完成。
加载locationManager的代码:

CLLocationManager *locationManager = [[CLLocationManager alloc] init];//创建位置管理器  
locationManager.delegate=self;  
locationManager.desiredAccuracy=kCLLocationAccuracyBest;  
locationManager.distanceFilter=1000.0f;  
//启动位置更新  
[locationManager startUpdatingLocation];

desiredAccuracy为设置定位的精度,可以设为最优,装置会自动用最精确的方式去定位。
distanceFilter是距离过滤器,为了减少对定位装置的轮询次数,位置的改变不会每次都去通知委托,而是在移动了足够的距离时才通知委托程序,它的单位是米,这里设置为至少移动1000再通知委托处理更新。
startUpdatingLocation就是启动定位管理了,一般来说,在不需要更新定位时最好关闭它,用stopUpdatingLocation,可以节省电量。

对于委托CLLocationManagerDelegate,最常用的方法是:

- (void)locationManager:(CLLocationManager *)manager   
    didUpdateToLocation:(CLLocation *)newLocation   
           fromLocation:(CLLocation *)oldLocation;

这个方法即定位改变时委托会执行的方法。
可以得到新位置,旧位置,CLLocation里面有经度纬度的坐标值,
同时CLLocation还有个属性horizontalAccuracy,用来得到水平上的精确度,它的大小就是定位精度的半径,单位为米。
如果值为-1,则说明此定位不可信。

另外委托还有一个常用方法是

- (void)locationManager:(CLLocationManager *)manager   
       didFailWithError:(NSError *)error ;

当定位出现错误时就会调用这个方法。
———–
转自:http://blog.csdn.net/csj1987/article/details/6657468

Hello World

jquery unbind不能用于live

刚发现使用jquery时容易犯的一个错误:使用unbind解绑live注册的事件,应该使用die进行解绑

关于unbind与bind,请参考这里:http://www.jiangkl.com/2011/03/jquery_bind_unbind/

die与live的用法如下:

<button id="theone">Does nothing...</button>
<button id="bind">Bind Click</button>
<button id="unbind">Unbind Click</button>
<div style="display:none;">Click!</div>
<script>
function aClick() {
  $("div").show().fadeOut("slow");
}
$("#bind").click(function () {
  $("#theone").live("click", aClick)
              .text("Can Click!");
});
$("#unbind").click(function () {
  $("#theone").die("click", aClick)
              .text("Does nothing...");
});
</script>

———–